
Creating a customized overlay effect
Here you can see a customized "drop" overlay effect. We set up things similarly as in the basic setup, but we have modified the loading effect with our own:


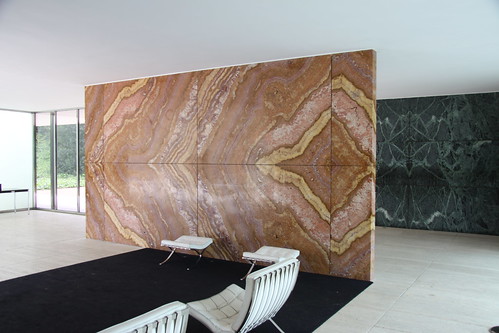
The Barcelona Pavilion
Barcelona, Spain
The Barcelona Pavilion, designed by Ludwig Mies van der Rohe, was the German Pavilion for the 1929 International Exposition in Barcelona, Spain. It was an important building in the history of modern architecture.
Several critics, historians and modernists have declared it "the most beautiful building of the century"

The Barcelona Pavilion
Barcelona, Spain
Another unique feature of this building is the exotic materials Mies chose to use.
Plates of high-grade stone materials like veneers of Tinos verde antico marble and golden onyx as well as tinted glass of grey, green, white, in addition to translucent glass, perform exclusively as spatial dividers.
Custom easing for the jQuery animate method
We start by adding a new animation algorithm for jQuery called "drop". This is possible by extending the jQuery.easing object. I grabbed this easing function from the jQuery Easing Plugin's source code. There are quite a lot of different easing algorithms that you can try.
// create custom animation algorithm for jQuery called "drop"
$.easing.drop = function (x, t, b, c, d) {
    return -c * (Math.sqrt(1 - (t/=d)*t) - 1) + b;
};
Custom Overlay effect
Custom overlay effects are done with the $.tools.overlay.addEffect method. The first argument is the effect name, the second argument is the function that defines how the overlay is shown and the third argument defines how the overlay closes. Inside the functions the this variable is a reference to the overlay API.
The loading function receives two arguments. The first argument css defines the top and left properties given in the configuration. The second argument is a callback function that must be called after you have performed your loading effect.
// loading animation
$.tools.overlay.addEffect("drop", function(css, done) {

    // use Overlay API to gain access to crucial elements
    var conf = this.getConf(),
    overlay = this.getOverlay();

    // determine initial position for the overlay
    if (conf.fixed)  {
        css.position = 'fixed';
    } else {
        css.top += $(window).scrollTop();
        css.left += $(window).scrollLeft();
        css.position = 'absolute';
    }

    // position the overlay and show it
    overlay.css(css).show();

    // begin animating with our custom easing
    overlay.animate(
        { top: '+=55',  opacity: 1,  width: '+=20'}, 400, 'drop', done
    );

    /* closing animation */
}, function(done) {
    this.getOverlay().animate(
        {top:'-=55', opacity:0, width:'-=20'}, 300, 'drop',
        function() {
            $(this).hide();
            done.call();
        });
});
Note: you can get access to the configuration option with the this.getConf() method, and you can use this object to supply custom configuration options as well.
JavaScript coding
Here is the overlay configuration. We supply our newly created overlay effect with the effect configuration variable.
$("img[rel]").overlay({
    effect: 'drop',
    mask: '#789'
});


